Tuesday, June 23, 2009

Meagan Wants You...!


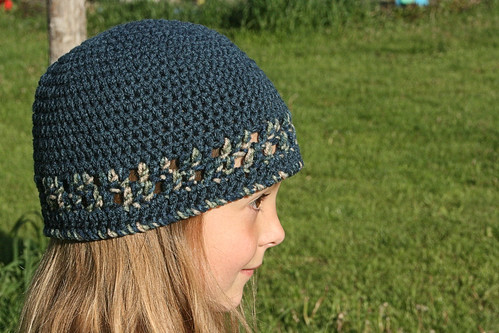
This fits my 7 and 8 year old just right. About 23 inches around.

I used a J hook and Red Heart Super Saver, but any WW should work fine, and a button of your choice. I used some leftover of one skein, not quite sure how much, but maybe about half
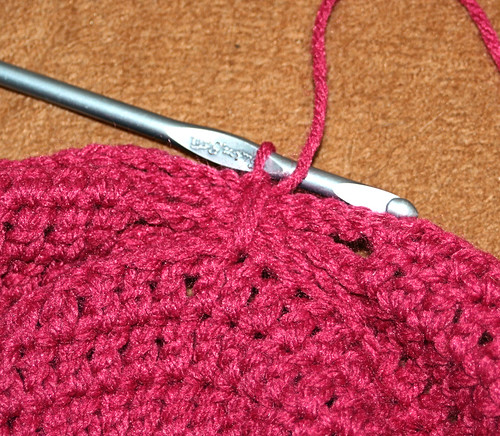
Rnd 1) ch3, 11 dc in 3rd ch from hook, join to top of first dc.
Rnd 2) ch2, ( does not count as first dc now and through out) 2dc in each st around, join to top of first dc
Rnd 3) ch2, 2dc in first st, * dc in next st, 2dc in next st repeat from * around, sl st to join
Rnd 4) ch2, 2dc in first st, * dc in next 2 sts, 2dc in next st, repeat from * around, sl st to join
Rnd 5) ch2, 2dc in first st, * dc in next 3 sts, 2dc in next st, repeat from * around, sl st to join
Rnd 6) ch2, 2dc in first st, * dc in next 4sts, 2 dc in next st, repeat from * around, st st to back loop of first dc
Rnd 7) ch2, dc in back loop of first st in back loop of each st accross, sl st to join
Rnd 8) ch2, dc in first 4 sts, dc next 2sts together, *dc in next 4sts, dc next 2sts together, repeat from * around, sl st to join.
Rnd 9-12) ch2, dc in first st and in each st around, sl st to join fasten off.
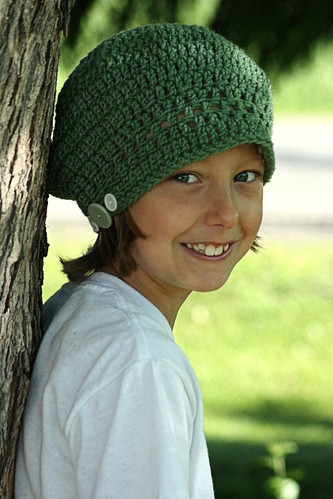
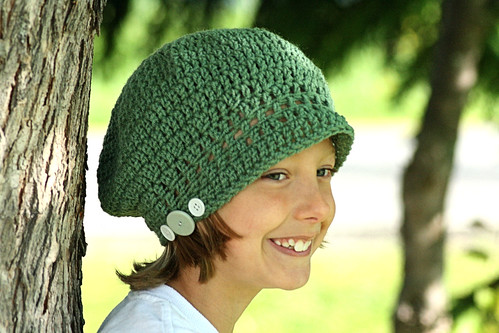
Visor : Row 1) join yarn in 20th st from fasten off point, sc in same st, hdc in next st, 2dc in next st, *dc in next st, 2dc in next st, repeat from* 4 more times, hdc in next st, sc in next st, ch1 turn
Row 2) sc in first st, hdc in next st, 2dc in next st, *dc in next st, 2dc in next st, repeat from * 8 more times, hdc in next st, sc in next st, fasten off.

Join yarn at first fasten off poin on the back side of hat, sc in same st and in next 18sts, sc evenly around visor, sc in dc sts around hat and join to first sc, fasten off.
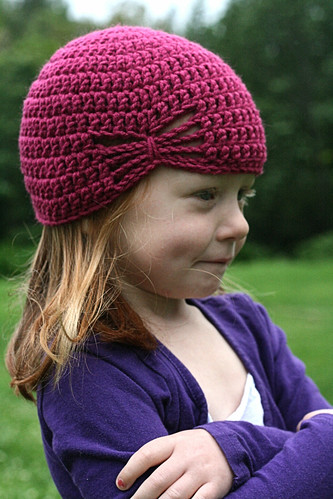
Strap : Rnd 1) ch 32, 2hdc in second ch from hook, hdc accross chain, 4hdc in last ch, working on opposite side of ch, hdc accross, 2hdc in first ch, sl st to top of first hdc,
Rnd 2) ch1, 2sc in same st, 2sc in next st, sc in next 29sts, 2sc in next 3sts, sc accross to last st, 2sc in last st, join to first sc fasten off.

Sew one side of strap to side of hat just above one side of the visor, sew other end to opposite side of visor using button to tack down. Enjoy.
Please use my patterns for whatever you like, just give me credit for the pattern. Thanks a bunch

Monday, June 22, 2009

Olivia's Butterfly


This is a very simple hat and very quick to make. Using a J hook and worsted weight yarn, I used red heart, and it fits a 20 1/2 inch head very nicely. Very easily adjustible by either adding increase rows or taking away.
Rnd 1) ch3, 11dc in 3rd ch from hook (11dc) sl st to top of first dc (now and through out),
Rnd 2) ch2, (does not count as dc now and through out) 2dc in each st around, sl st to top of first dc
Rnd 3) ch 2 * 2dc in first st, 1dc in next st around, repeat from * around slip st to join
Rnd 4) ch2, *2dc in first st, dc in next 2dc , repeat from * around, join
Rnd 5) ch2, * 2dc in first st, dc in next 3dc , repeat from * around, join
Rnd 6) ch2, dc in same st and each st around
Rnd 7 and 8) Repeat rnd 6
Rnd 9) ch2, dc in same st, dc in next 21 sts, ch10, skip next 9 sts, dc in next st and in each st accross, slip st to join
Rnd 10) ch2, dc in same st and in next 21 sts, ch 10, skip 10 chains, dc in next dc and in each remaining dc, slip st to join
Rnd 11 and 12) Repeat rnd 10
Rnd 13) ch1, sc in same st and in next 21 sts, ch5, sc over all ch 10's by bunching together and into 5th dc of the 9 skipped dc on row 9, ch5, sc in next dc and in each dc around slip stitch to join, fasten off. I hope you can see in the pic how I did row 13.
Please feel free to sell your creations as you like... just maybe link to my pattern or tag with my website. Thanks, and happy hooking.


Saturday, June 13, 2009

Jayde Hat


This is a very simple and quick hat, using a ww yarn. I would like to try to do some in something other than Red Heart, but right now that's all I have on hand.
J hook, ww yarn and notions of your choice, buttons, silk flowers, crochet flower patterns are free on the web!
Rnd 1) ch3, 11dc in 3rd ch from hook (11dc) sl st to top of first dc (now and throughout),
Rnd 2) ch2, (does not count as dc throughout) 2dc in each st around, sl st to top of first dc
Rnd 3) ch 2 * 2dc in first st, 1dc in next st around, join
Rnd 4) ch2, *2dc, dc in next 2dc around, jolin
Rnd 5) ch2, * 2dc, dc in next 3dc around, join
Rnd 6) ch2, * 2dc, dc in next 4dc around join
Rnd 7) ch2, * 2dc, dc in next 5dc around join
Rnds 8-10) ch2, dc in each st around, join
Rnd 11) ch2, dc in first 2dc, * dc next 2dc together (dc decrease), dc in next 2dc, repeat from * around, join
Rnd 12) ch2, dc in first st, * dc next 2dc tog (dc decrease), dc in next dc, repeat from * around, join
Rnd 13) ch2, dc in each st around, join
Round 14) ch1, sc in first st and in next 14dc, hdc in next st,* dc in next st, 2dc in next st, repeat from * 5 more times, hdc in nextst, sc across remaining sts, join,
Round 15)ch1, sc in fist st and in next 14sc, hdc in next st,* dc in next st, 2dc in next st, repeat from * 8 more times, hdc in next st, sc in remaining sts, join.
Rnd 16) ch 1, sc in each st around. join Fasten off, weave in ends

I added a few buttons on the side, any kind of decoration would work, or leave it plain. Happy Hooking!
All I ask is that you don't use the pattern to sell, you may sell your own creations, but it would be nice to have the pattern credited to me. :o)

Monday, June 8, 2009

Star in Bloom


I used a G hook and ww yarn


This is a very rough pattern, as I didn't write it down as I went.... so please let me know if you have any questions, It's like working a granny square with an extra corner!

Rnd 1, ch5 sl st to form circle, join, ch3, 2dc in circle, * ch2, 3dc, repeat 3 more times, sl st to top of ch 3. (5 ch2 spaces)
Rnd 2) sl st in next st and ch2 sp, ch3, 2dc, ch2,3dc in smae space, * ch1, 3dc,ch2 3dc in next sp, ch1, repeat around.
Rnd 3-5) sl st in next st and next ch2 sp, ch2, 2dc, ch2, 3dc in same sp, *ch1, 3dc in next sp, ch1, 3dc, ch2, 3dc in next sp, repeat around... rows 4 and 5 will increase one more time each in between corners

Using contrasting color, with wrong sides facing, attach yarn in ch two space with sc, sc evenly around through both "stars", along three sides, sc in ch 2 sp... here I also went around the opening with sc. Fasten off.


Leaf... I made two:
ch8, sl in first ch, sc in next 2ch, hdc in next ch, 2dc in next ch, 3sc in last ch, now working on opposite side, dc in next 2sts, hdc in next st, sc in next 2 sts, sl to last fasten off and attache to desired spot on star
For handle, ch 2, 6sc in second ch, do not join, continue sc around for about 8-9 inches. fasten off and attatch to star.

Friday, June 5, 2009

One More Granny Square Bag


I have become obsessed with Granny Squares again this week... every once in a while I just need to make some. So here is another bag I made yesterday for you to play around with if you like.

I hook and ww yarn

Hopefull you see the layout well enough in the pictures.
I made three full squares done in 7 rounds, attached them by folding them in half and sewing the sides together matching the points. This makes a triangled gap at the top. Here is wher I made two half granny squares doing only 6 rnds and fitting them in and attaching a button and strap. Very simple, and quick to make up.

Thursday, June 4, 2009

Get Your Granny On~ bag


I used a J hook for these


I really wanted to do some granny squares, but really didn't feel like making a blanket, so I made a couple of bags, I like the larger one to use for beach stuff etc....These could be very easily lined with fabric to make a nice bag to hole some of the smaller stuff too.

These are just a few basic granny squares turned on their sides. For the blue and brown bag I used three squares done in 8 rounds. Bottom square foled in half, I pieced together by folding two more in half and attaching two sides making them look like triangles... It's easy to see in the pictures if you need help leave me a comment. I didn't make the strap very long as there is a big gap in this one.
I made straps by making a long chain for what I wanted for length, hdc around both sides and then sc around for the second rnd.

For the Green and yellow bag I used four (only 6 rounds on this one) squares and attached as the larger bag and the fourth one I filled in the triangle in the back and used as a flap. I added two more rows to the top side for it to come down over the front of the bag and attached a button to fit through one of the corners. Would love to see any pictures if you make one or two or more! :o) Happy hooking.

V Stitch Water Sling


Nice to have when out walking with the strap or just as a cozy without.
Materials: G hook, small amount of ww yarn, needle
V st~ dc,ch1,dc in same st


Rnd 1) ch2, 9hdc in second ch from hook, join
Rnd 2) ch1 (does not count as first st), 2hdc in each st around, join
Rnd 3) ch1, 2hdc in same st, * hdc in next st, 2hdc in next st around, join to back loop of first hdc
Rnd 4) working in back loops this round only, ch2, dc in each st around, join
Rnd 5) ch 2, dc in each st around, join
Rnd 6) ch3, dc in same st,* skip next 2 sts, V stitch in next st around, join to 2nd ch of first ch3
Rnd 7) sl st to ch space of first V stitch, ch 3, dc in same st, V st in each V stitch around.
Rnd 8-12) Repeat rnd 7
Rnd 13) ch1, sc in each st around, fasten off weave in ends
If you want a strap I just chained what I wanted for length, this time it was about 70 chains, 2sc in second ch from hook, sc in each ch accross, 3sc in last ch, work sc accross back side 1sc in same ch as first 2sc, (change color if desired) ch 1, hdc in same st and in each sc accross, 2hdc in very last two sc before working back side,( I just kinda eyeballed it) hdc accross, 2hdc in last 2sc. fasten off weave in ends. Attatch ends a little ways down the side of cozy, I did about an inch and a half, and there you go... Enjoy

Please feel free to use this pattern to make things for whatever you wish, personal use, gifts or to sell, just please don't sell the pattern as your own. I would love to see pictures if you would like to share.


Happy Hooking.

Monday, June 1, 2009

Bluesy Gauntlets


These were made to fit me snugly, mostly to have room for stretching since I used the Red Heart super saver

With H hook and main color
Row 1) ch 28, dc in 3rd ch from hook and accross, ch2 turn
Row 2 and 3) dc in each st accross, ch2 turn
Row 4) dc in each st accross, sl st to join. Now working in Rnds
Rnd 5) ch 2 (does not count as first st now and through out) dc in each st around
Rnd 6) Decrease row, ch2 dc in same st, dc in next st, dc next 2 sts together,* dc in next st, dc next 2 sts tog, repeat around

Rnd 7) ch 2, dc in same st, dc in next st,* dc next 2 sts tog, dc in next 3 sts, around
Rnd 8) ch 2, dc in each st around.
Rnd 9) thumb increase, ch 2, 2dc in same st, 2dc in next st, dc in next st and in each st around
Rnd 10 and 11) Repeat row 9
Rnd 12 and 13) ch 2, dc in each st around
Rnd 14) ch 2, dc in same st, dc in next st, ch3, skip next 4sts, dc in next st, and in each st around
Rnd 15) ch2, dc in each st and ch around

Rnd 16 and 17) ch 2, dc in each st around
Rnd 18) change to cc if desired, sc in each st around fasten off
Bottom of gauntlet, using cc sc evenly around.
I added a button to the top side of the v at the very bottom of the gauntlet to dress it up a bit. Have fun and Happy Hooking.... please let me know if you find any errors, I will be happy to fix it.!


You are welcome to use my patterns for personal use or for craft fairs and such, but please don't sell the pattern as your own. Thank you :o)

The Blues Hat


This is to fit and adult, but my daughter said it fits her nice, with a little bit of room... :o)

With worsted weight yarn and an H hook,
Row 1) ch2, 9 hdc in second ch from hook, sl st to join .


Row 2) ch1, 2 hdc in same st and in each st around. join


Row 3) ch1, 2 hdc in same st, *1 hdc in next st, 2 hdc in next st, around


Row 4) ch1, 2 hdc in same st,* hdc in next 2 sts, 2 hdc in next st, around


Row 5) ch1, 2 hdc in same st, * hdc in next 3 sts, 2 hdc in next st, around


Row 6) ch 1, 2 hdc in same st, * hdc in next 4 sts, 2 hdc in next st, around


Row 7) ch1, 2 hdc in same st, * hdc in nest 5 sts, 2 hdc in next st, around


Row 8) ch1, 2 hdc in same st, * hdc in next 6 sts, 2 hdc in next st, around


Row 9-15) ch1, hdc in same st and in each st around. Change to contrasting color


Row 16) ch2, dc in next 2 hdc,* ch1, skip next st, dc in next 3 sts, repeat around join to top of ch2


Row 17) sl st into next 2 st ch2, dc in ch1 sp, dc in next st ,* ch1 skip next st, dc in next dc and ch1 sp and next dc. repeat around. sl st to top of ch2


Here is where I switched back to main color,


Row 18) ch2, dc in each st around


Row 19) with CC reverse sc around. fasten off weave in ends.